This section describes the NIS+ scripts, specifically:
Note: Before running the NIS+ setup scripts, make sure you have performed the steps described in Prerequisites for Installing and Configuring NIS+.
The three NIS+ scripts--nisserver, nispopulate, and nisclient--enable you to set up an NIS+ namespace easily. The NIS+ scripts are shell scripts that execute groups of NIS+ commands. The following table describes what each script does.
| NIS+ Scripts | |
|---|---|
| NIS+ Script | What It Does |
| nisserver | Sets up the root master, nonroot master and replica servers with level 2 security (DES) by default. Additionally, can be used to remove a server. |
| nispopulate | Populates NIS+ tables in a specified domain from their corresponding system files or NIS maps. |
| nisclient | Creates NIS+ credentials for hosts and users; initializes NIS+ clients and users. Can also be used to restore the previous environment or to remove a client. |
In combination with a few NIS+ commands, you can use the NIS+ scripts to perform all the tasks necessary for setting up an NIS+ namespace. See the nisserver, nispopulate, and nisclient command descriptions for a complete discussion of these commands and their options. Setting Up a Typical Namespace with Scripts shows you how to use the NIS+ scripts to set up an NIS+ namespace.
You can run each of the scripts without having the commands execute by using the -x option. This option lets you see what commands the scripts call and their approximate output without the scripts actually changing anything on your systems. First running the scripts with -x may minimize unexpected surprises.
While the NIS+ scripts reduce the effort required to create an NIS+ namespace, the scripts do not completely replace the individual NIS+ commands. The scripts only implement a subset of NIS+ features.
If you are unfamiliar with NIS+, you may wish to refer back to this section after you have created the sample NIS+ namespace.
The nisserver script will only set up an NIS+ server with the standard default tables and permissions (authorizations). This script does not:
See Setting Up a Typical Namespace with Scripts for how to use the nisgrpadm command instead of one of the NIS+ scripts to add extra NIS+ principals to the NIS+ admin group.
See Setting Up a Typical Namespace with Scripts for how to use the rpc.nisd command instead of one of the NIS+ scripts to change NIS+ client machines into nonroot servers.
The nisclient script does not set up an NIS+ client to resolve host names using DNS. You need to explicitly set DNS for clients that require this option.
You can set up a basic NIS+ namespace using the nisserver, nispopulate, and nisclient scripts in combination with a few NIS+ commands.
Note: It is strongly recommended that you use the scripts described in this section to setup and configure an NIS+ namespace.
See the nisserver, nispopulate, and nisclient command descriptions for more information about the scripts.
Do not use the small sample NIS+ namespace described in this tutorial as a basis for your actual NIS+ namespace. Delete the sample namespace after you are finished practicing. Do not add real data to it. It is better to begin again and carefully plan your NIS+ hierarchy before you create your actual namespace.
The following table summarizes the
recommended generic setup procedure. The left column lists the major
setup activities, such as setting up the root domain or creating a
client. The text in the middle describes the activities. The
third column lists which script or NIS+ commands accomplish each step.
| Recommended NIS+ Setup Procedure Overview | ||
|---|---|---|
| Activity | Description | Script/NIS+ Commands |
| Plan your new NIS+ namespace | Plan your new NIS+ namespace. See Prerequisites for Installing and Configuring NIS+ for a full discussion of planning requirements and steps. (If you are following the NIS+ tutorial in a test network, this step has been done for you.) | |
| Prepare your existing namespace | Prepare your current namespace (if any) so the scripts run most efficiently. See Preparing the Existing Namespace for a details. (If you are following the NIS+ tutorial in a test network, this step has been done for you.) | |
| Set up root domain | Create the root domain. Set up and initialize the root master server. Create the root domain admin group. | nisserver |
| Populate tables | Populate the NIS+ tables of the root domain from text files or NIS maps. Create credentials for root domain clients. Create administrator credentials. | nispopulate, nisgrpadm, nisping |
| Set up root domain clients | Set up the client machines. (Some of them will subsequently be converted into servers.) Initialize users as NIS+ clients. | nisclient |
| Enable servers | Enable some clients of the root domain to become servers. Some servers will later become root replicas; others will support lower-level domains. | nisserver |
| Set up root replicas | Designate one or more of the servers you just set up as replicas of the root domain. | nisserver -R |
| Set up nonroot domains | Create a new domain. Designate previously enabled server as its master. Create its admin group and admin credentials. | rpc.nisd |
| Populate tables | Create credentials for clients of the new domain. Populate the NIS+ tables of the new domain from text files or NIS maps. | nispopulate |
| Set up nonroot domain clients | Set up the clients of the new domain. (Some may subsequently be converted into servers for lower-level domains.) Initialize users as NIS+ clients. | nisclient |
The NIS+ scripts enable to you to skip most of the individual procedures included in the above activities.
The procedures in this section show you how to create a sample NIS+ namespace. The sample NIS+ namespace will be created from /etc files and NIS maps. This sample shows you how to use the scripts both when your site is not running NIS and when NIS is running at your site. You can set your servers to NIS-compatibility mode if they will be serving NIS clients. See Using NIS-Compatibility Mode for more information on NIS-compatibility mode.
Note: Your site's actual NIS+ namespace and its domain hierarchy will probably differ from the sample namespace, and yours will probably contain a different number of servers, clients, and domains. The sample namespace is only an example of how to use the NIS+ scripts.
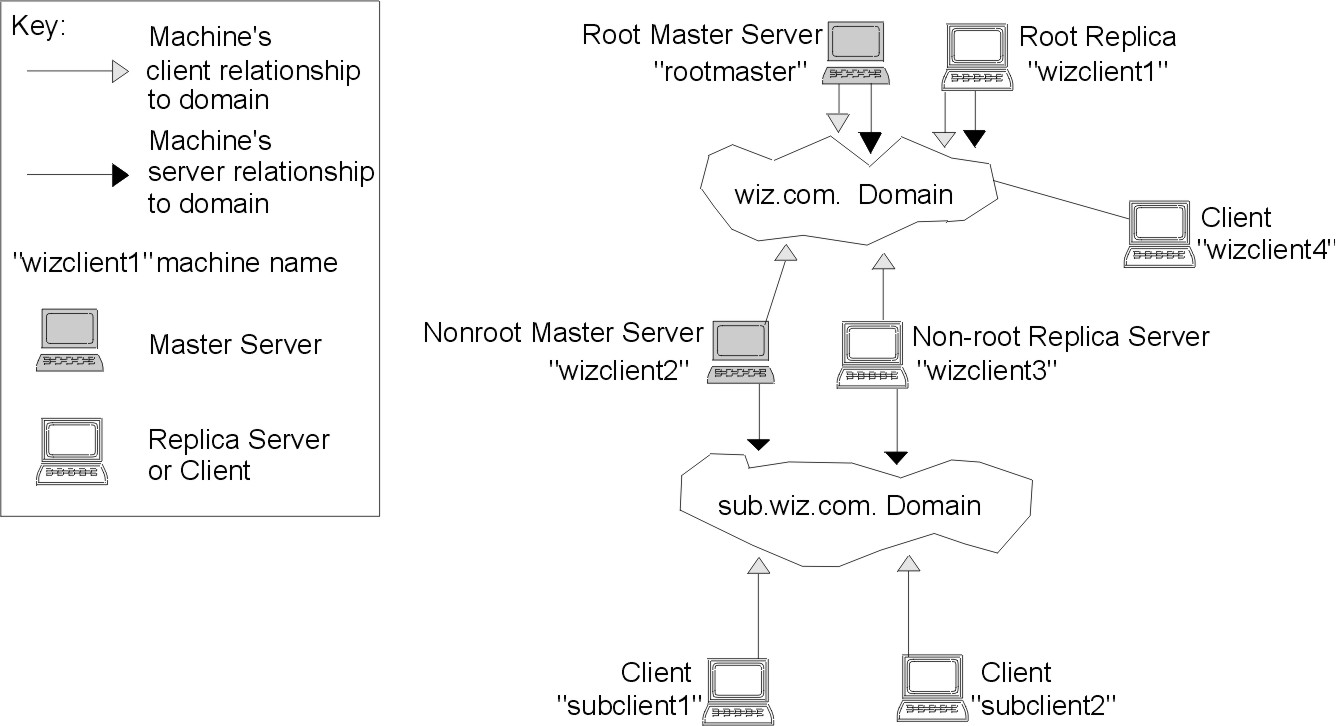
The sample namespace contains the following components:
This scenario shows the scripts being used to set up NIS+ at a site that uses both system information files, such as /etc/hosts, and NIS maps to store network service information. The sample NIS+ namespace uses such a mixed site purely for example purposes.
The following figure shows the layout of the sample namespace. When you finish creating the sample domain, it should resemble the NIS+ domain in this figure. Notice that some machines are simultaneously servers and clients.
Figure 5-1. Example NIS+ Domain. This illustration shows how the root master server and its replicas support the root domain, which is accessed by clients and nonmaster servers and propagated to subdomains.
|
The following table contains the
generic sequence of NIS+ scripts and commands you use to create the NIS+
domains shown in the previous figure. Subsequent sections describe
these command lines in detail. After you are familiar with the tasks
required to create NIS+ domains, servers, and clients, use this table as a
quick-reference guide to the appropriate command lines.The table
summarizes the actual commands with the appropriate variables you use to
create the sample NIS+ namespace.
| NIS+ Domains Setup Command Lines Summary | ||
|---|---|---|
| Action | Machine | Command |
| Include /usr/lib/nis in root's path. | Root master server and client machines as root user |
PATH=$PATH:/usr/lib/nis; \ export PATH |
| Create a root master server without or with NIS (YP) compatibility. | Root master server as root user |
nisserver -r -d newdomain. or
nisserver -Y -r -d newdomain. |
| Populate the root master server tables from files or from NIS maps. | Root master server as root user |
nispopulate -F -p /files \
-d newdomain.
or
nispopulate -Y -d newdomain. \ -h NIS_servername \ -a NIS_server_ipaddress \ -y NIS_domain |
| Add additional users to the NIS+ admin group. | Root master server as root user |
nisgrpadm -a admin.domain. \ name.domain. |
| Make a checkpoint of the NIS+ database | Root master server as root user |
nisping -C domain. |
| Initialize a new client to the server. | Server machine as root user |
nisclient -c clientname Note: If you get an error that this client does not exist, add the following entry to the hosts table:
nistbladm -a name=clientname \
  cname=clientname \
  addr=ipaddress hosts.org_dir
If clientname exists in /etc/hosts, you do not need to run this command. |
| Initialize a new client machine. | Client machine as root user |
nisclient -i \ -d domain. \ -h rootmaster |
| Initialize user as an NIS+ client. | Client machine as user |
nisclient -u |
| Start the rpc.nisd daemon--required to convert a client to a server without or with NIS (and DNS) compatibility. | Client machine as root user |
startsrc -s rpc.nisd or
startsrc -s rpc.nisd -a "-Y" or
startsrc -s rpc.nisd -a "-Y -B" |
| Convert a server to a root replica. | Root master server as root user |
nisserver -R \ -d domain. \ -h clientname |
| Convert a server to a nonroot master server. | Root master server as root user |
nisserver -M \ -d newsubdomain.domain. \ -h clientmachine |
| Populate the new master server tables from files or from NIS maps. | New subdomain master server as root user |
nispopulate -F \
  -p /subdomaindirectory \
  -d newsubdomain.domain.
or
nispopulate -Y \ -d newsubdomain.domain. \ -h NIS_servername \ -a NIS_server_ipaddress \ -y NIS_domain |
| Convert a client to a master server replica. | Subdomain master server as root user |
nisserver -R \ -d subdomain.domain. \ -h clientname |
| Initialize a new client of the subdomain. Clients can be converted to subdomain replicas or to another server. | New subdomain client machine as root user |
nisclient -i \ -d newsubdomain.domain. \ -h subdomainmaster |
| Initialize user as an NIS+ client. | Client machine as user |
nisclient -u |
Note: To see what commands an NIS+ script calls without actually having the commands execute, use the -x option. The -x option causes the command names and their approximate output to echo to the screen as if you were actually running the script.
Setting up the root master server is the first activity towards establishing NIS+ domain. This section shows you how to set up a root master server using the nisserver script with default settings. The root master server uses the following defaults:
Check to see that the /etc/passwd file on the machine you want to be root master server contains an entry for root.
You need the following:
In the following example, the machine to be designated the root master server is called rootmaster, and wiz.com. is the new root domain.
Attention: Domains and hosts should not have the same name. For example, if you have wiz.com as a root domain you should not have a machine named wiz in any of your domains. Similarly, if you have a machine named home, you do not want to create a domain named home. This caution applies also to subdomains; for example, if you have a machine named west, do not create a sales.west.myco.com subdomain. If names are not unique, NIS+ cannot parse addresses correctly. See the chypdom command description.
The -r option indicates that a root master server should be set up. The -d option specifies the NIS+ domain name.
rootmaster# nisserver -r -d wiz.com.

This script sets up this machine "rootmaster" as an NIS+
root master server for domain wiz.com.

Domain name                            : wiz.com.
NIS+ group                 : admin.wiz.com.
NIS (YP) compatibility        : OFF
Security level                         : 2=DES
Is this information correct? (type 'y' to accept, 'n' to change)
NIS+ group refers to the group of users who are authorized to modify the information in the wiz.com. domain. (Authorization to modify also gives the group authorization to delete.) admin.domainname is the default name of the group. See Changing Incorrect Information for instructions on how to change this name.
NIS compatibility refers to whether an NIS+ server will accept information requests from NIS clients. When set to OFF, the default setting, the NIS+ server will not fulfill requests from NIS clients. When set to ON, an NIS+ server will fulfill such requests. You can change the NIS-compatibility setting with this script. See Changing Incorrect Information.
Note: This script sets machines up only at security level 2, the highest level of NIS+ security. You cannot change the security level when using this script. If you need to change the security level, use the appropriate NIS+ command after the script has completed. See NIS+ Security Levels and the rpc.nisd documentation for more information on changing security levels.
Typing n causes the script to prompt you for the correct information. (See Changing Incorrect Information.)
Is this information correct? (type 'y' to accept, 'n' to change) y

This script will set up your machine as a root master server for
domain wiz.com. without NIS compatibility at security level 2.

Use "nisclient -r" to restore your current network service environment.

Do you want to continue? (type 'y' to continue, 'n' to exit the script)
(Typing n safely stops the script.) If you interrupt the script after you have chosen y and while the script is running, the script stops running and leaves set up whatever it has created so far. The script does not do any automatic recovery or cleanup. You can rerun this script.
Do you want to continue? (type 'y' to continue, 'n' to exit the script

setting up domain information "wiz.com." ...

The rpc.nisd Subsystem has been started.
The nis_cachemgr Subsystem has been started.
The rpc.nispasswdd Subsystem has been started.

running nisinit ...
This machine is in the wiz.com. NIS+ domain.
Setting up root server ...
All done.

starting root server at security level 0 to create credentials...
running nissetup ...
(creating standard directories & tables)
org_dir.wiz.com. created
...
...
Enter login password:
The nissetup command creates the directories for each NIS+ table.
In this example, the user typed the rootmaster machine's root password.
Wrote secret key into /etc/.rootkey

setting NIS+ group to admin.wiz.com. ...

restarting root server at security level 2 ...


This system is now configured as a root server for domain wiz.com.
You can now populate the standard NIS+ tables by using the
nispopulate or /usr/lib/nis/nisaddent commands.
Your root master server is now set up and ready for you to populate the NIS+ standard tables. To continue with populating tables, skip to Populating NIS+ Tables.
If you typed n because some or all of the information returned to you was incorrect in Step 3 in the above procedure, the following displays:
Is this information correct? (type 'y' to accept, 'n' to change) n
Domain name: wiz.com.
In the following example, Return was pressed, confirming that the desired domain name is wiz.com. The script then prompts for the NIS+ group name.
Is this information correct? (type 'y' to accept, 'n' to change) n
Domain name: [wiz.com.]
NIS+ group: [admin.wiz.com.]
In the following example, the name was changed. The script then prompts for NIS compatibility.
NIS+ group: [admin.wiz.com.] netadmin.wiz.com.
NIS (YP) compatibility (0=off, 1=on): [0]
In the following example, Return was pressed, confirming that NIS compatibility status is correct. Once again, the script asks you if the information is correct.
Note: If you choose to make this server NIS compatible, you also need to edit a file and restart the rpc.nisd daemon before it will work. See Configuring an NIS+ Server for more information.
NIS (YP) compatibility (0=off, 1=on): [0]

Domain name                         : wiz.com.
NIS+ group              : netadmin.wiz.com.
NIS (YP) compatibility     : OFF
Security level                      : 2=DES

Is this information correct? (type 'y' to accept, 'n' to change)
Once the information is correct, continue with Creating a Root Master Server. You can keep choosing n until the information is correct.
Notes:
- If you make a mistake and want to start over, use the nisserver -D command. However, running nisserver -D removes everything from the /var/nis directory, including the directory itself. If you are running in NIS-compatibility mode, it also removes /var/yp/ypdomain.
- This script sets machines up only at security level 2. If you need to change the security level, use the appropriate NIS+ command after the script has completed. See NIS+ Security Levels and the rpc.nisd documentation for more information on changing security levels.
Once the root master server has been set up, populate its standard NIS+ tables with name services information. This section shows you how to populate the root master server's tables with data from files or NIS maps using the nispopulate script with default settings. The script uses:
Before you can run the nispopulate script, do the following:
For example, you may want to remove the following lines from the copy of your local passwd file so they will not be distributed across the namespace:
root:!:0:0::/home/root:/bin/ksh
daemon:!:1:1::/etc:
bin:!:2:2::/bin:
sys:!:3:3::/usr/sys:
adm:!:4:4::/var/adm:
uucp:!:5:5::/usr/lib/uucp:
guest:!:100:100::/home/guest:
nobody:!:4294967294:4294967294::/:
lpd:!:9:4294967294::/:
nuucp:*:6:5:uucp login user:/var/spool/uucppublic:/usr/sbin/uucp/uucico
ftp:*:200:1::/home/ftp:/usr/bin/ksh
anonymous:*:201:1::/home/ftp:/usr/bin/ksh
admin:!:202:1::/home/admin:/usr/bin/ksh
If you are populating from files, you need:
If you are populating from NIS maps, you need:
Note: The NIS domain name is case-sensitive, while the NIS+ domain name is not.
The first alternative illustrates populating tables from files. The second shows you how to populate tables from NIS maps. Type these commands in a scrolling window; otherwise, the script output may scroll off the screen.
Note: The nispopulate script may fail if there is insufficient /tmp space on the system.
rootmaster# nispopulate -F -p /nis+files -d wiz.com.

NIS+ domain name        : wiz.com.
Directory Path                      : /nis+files

Is this information correct? (type 'y' to accept, 'n' to change)
The -F option indicates that the tables will take their data from files. The -p option specifies the directory search path for the source files. (In this case, the path is /nis+files.) The -d option specifies the NIS+ domain name. (In this case, the domain name is wiz.com.)
The NIS+ principal user is the root user. You must perform this task as root user in this instance because this is the first time that you are going to populate the root master server's tables. The nispopulate script adds credentials for all members of the NIS+ admin group.
rootmaster# nispopulate -Y -d wiz.com. -h corporatemachine \
  -a 130.48.58.111 -y corporate.wiz.com.

NIS+ domain name              : wiz.com.
NIS (YP) domain                  : corporate.wiz.com
NIS (YP) server hostname         : corporatemachine

Is this information correct? (type 'y' to accept, 'n' to change)
where:
The NIS+ principal user is the root user. You must perform this task as root user when this is the first time that you are going to populate the root master server's tables. The nispopulate script also adds credentials for all members of the NIS+ admin group.
Typing n causes the script to prompt you for the correct information. (See Changing Incorrect Information.)
Is this information correct? (type 'y' to accept, 'n' to change) y

This script will populate the following NIS+ tables for domain
wiz.com from the files in /nis+files:
auto_master auto_home ethers group hosts networks passwd protocols services rpc
netmasks bootparams netgroup aliases shadow

**WARNING: Interrupting this script after choosing to continue
may leave the tables only partially populated. This script does
not do any automatic recovery or cleanup.

Do you want to continue? (type 'y' to continue, 'n' to exit this script)
Is this information correct? (type 'y' to accept, 'n' to change) y

This script will populate the following NIS+ tables for domain
wiz.com. from the NIS (YP) maps in domain corporate:
auto_master auto_home ethers group hosts networks passwd protocols services rpc
netmasks bootparams netgroup aliases

**WARNING: Interrupting this script after choosing to continue
may leave the tables only partially populated. This script does
not do any automatic recovery or cleanup.

Do you want to continue? (type 'y' to continue, 'n' to exit this script)
(Typing n safely stops the script.) If you interrupt the script after you have chosen y--while the script's running--the script stops running and may leave the tables only partially populated. The script does not do any automatic recovery or cleanup. You can safely rerun the script, however, the tables will be overwritten with the latest information.
Do you want to continue? (type 'y' to continue, 'n' to exit this script) y


populating auto_master table from file /nis+files/auto_master...
auto_master table done.

populating auto_home table from file /nis+files/auto_home...
auto_home table done.

....
....

Credentials have been added for the entries in the hosts and
passwd table(s). Each entry was given a default network password
(also known as a Secure-RPC password). This password is:
                   nisplus
Use this password when the nisclient script requests the network
password.
Done!
Note: Remember this Secure RPC password and use it when you are prompted for your network or Secure RPC password.
The script continues until it has searched for all the files it expects and loads all the tables it can from the available files.
Do you want to continue? (type 'y' to continue, 'n' to exit this script) y

populating auto_master table from corporate.wiz.com NIS(YP) domain...
auto_master table done.

populating auto_home table from file corporate.wiz.com NIS(YP) domain...
auto_home table done.

....

Credentials have been added for the entries in the hosts and
passwd table(s). Each entry was given a default network password
(also known as a Secure-RPC password). This password is:
                    nisplus
Use this password when the nisclient script requests the network
password.
Done!
Note: Remember this Secure RPC password and use it when you are prompted for your network or Secure RPC password.
All the tables are now populated. You can ignore the parse error warnings shown above. The errors indicate that NIS+ found empty or unexpected values in a field of a particular NIS map. You may want to verify the data later after the script completes.
Note: The nispopulate command looks for certain tables or files and may not find all expected tables or files in your environment. It ends successfully if it populates at least one table or file.
For example, if your login ID is topadm and your co-worker's ID is secondadmin, you would enter:
rootmaster# nisgrpadm -a admin.wiz.com. topadm.wiz.com. secondadm.wiz.com.
Added "topadm.wiz.com." to group "admin.wiz.com.".
Added "secondadm.wiz.com." to group "admin.wiz.com.".
The admin.wiz.com. argument in the nisgrpadm -a command above is the group name which must come first. The remaining two arguments are the names of the administrators.
Note: This step is optional unless you want to add additional users to the existing admin group. You can also add users to the admin group after you have set up NIS+.
You do not have to wait for the other administrators to change their default passwords to perform this step. However, they must already be listed in the passwd table before you can add them to the admin group. Members of the admin group are unable to act as NIS+ principals until they add themselves to the domain. See Initializing NIS+ Client Users for more information on initializing users. The group cache must also expire before the new members become active.
rootmaster# nisping -C wiz.com.
Checkpointing replicas serving directory wiz.com.
Master server is rootmaster.wiz.com.
        Last update occurred at date

Master server is rootmaster.wiz.com.
checkpoint scheduled on rootmaster.wiz.com.
This step ensures that all the servers supporting the domain transfer the new information from their initialization (.log) files to the disk-based copies of the tables. Since you have just set up the root domain, this step affects only the root master server, because the root domain does not yet have replicas.
Attention: If you do not have enough swap or disk space, the server is unable to checkpoint properly, but it will not notify you. One way to checkpointing is going well is to list the contents of a table with the niscat command. For example, to check the contents of the rpc table, type:
rootmaster# niscat rpc.org_dir
rpcbind rpcbind 100000
rpcbind portmap 100000
rpcbind sunrpc 100000
If you do not have enough swap space, the following error message displays instead of the sort of output you see above.
can't list table: Server busy, Try Again.Even though it may not seem to, this message indicates that you do not have enough swap space. Increase the swap space and checkpoint the domain again.
Once the root master server's tables have been populated from files or NIS maps, you can initialize an NIS+ client machine. Since the root master server is an NIS+ client of its own domain, no further steps are required to initialize it. This section shows you how to initialize an NIS+ client by using the nisclient script with default settings. The NIS+ client machine is a different workstation than the NIS+ root server. The script uses:
Note: The -i option used in Initializing a New Client Machine does not set up an NIS+ client to resolve host names requiring DNS. You need to explicitly include DNS for clients in their name service switch files.
Before you can use the nisclient script, do the following:
You need:
The -i option initializes a client. The -d option specifies the new NIS+ domain name. (If the domain name is not specified, the default would be the current domain name.) The -h option specifies the NIS+ server's host name.
wizclient1# nisclient -i -d wiz.com. -h rootmaster

Initializing client wizclient1 for domain "wiz.com.".
Once initialization is done, you will need to reboot your
machine.

Do you want to continue? (type 'y' to continue, 'n' to exit this script)
Note: Typing n exits the script. The script only prompts you for the root server's IP address if there is no entry for it in the client's /etc/hosts file.
Do you want to continue? (type 'y' to continue, 'n' to exit this script) y

Type server rootmaster's IP address:
Type server rootmaster's IP address: 123.123.123.123

setting up the domain information...

setting up the name service switch information...

Client initialization completed!!
Please reboot your machine for changes to take effect.
You can now have the users of this NIS+ client machine add themselves to the NIS+ domain.
Repeat Initializing a New Client Machine on as many machines as you require. To initiate clients for another domain, repeat the procedure but change the domain and master server names to the appropriate ones.
The sample NIS+ domain described in this procedure assumes that you will initialize four clients in the domain wiz.com. You then configure two of the clients as nonroot NIS+ servers and a third client as a root replica of the root master server of the wiz.com. domain.
Note: You always have to make a system into a client of the parent domain before you can make the same system a server of any type.
Once a machine has become an NIS+ client, the users of that machine must add themselves to the NIS+ domain. Adding a user to the domain means changing the Secure RPC password to that user's login password, using the nisclient script.
Before you can use the nisclient script to initialize a user, do the following:
You need:
user1prompt% nisclient -u
Please enter the Secure-RPC password for user1:
Enter the Secure RPC password (nisplus, in this case). The password does not echo on the screen.
Please enter the login password for user1:

Your network password has been changed to your login one.
Your network and login passwords are now the same.
This user is now an NIS+ client. All users must make themselves NIS+ clients.
Now that the client machines have been initialized, you can change any of them to NIS+ servers but not into root NIS+ servers. Root NIS+ servers are a special type of NIS+ server. See Setting Up NIS+ Root Servers for more information. You need NIS+ servers for three purposes:
You can configure servers in three ways:
Servers and their replicas should have the same NIS-compatibility settings. If they do not have the same settings, a client that needs NIS compatibility set to receive network information may not be able to receive it if either the server or replica it needs is unavailable.
Note: If the root master server is unavailable and the NIS+ domain is being served solely by a replica, you can obtain information from the NIS+ tables, but changes to the original tables can be made only when the master server is available. Also, do not run a checkpoint (nisping -C) command when the root master server is unavailable. Checkpoint inaccurately updates entries in your local tables if the master server tables are unavailable.
This example shows the machine wizclient1 being changed to a server. This procedure uses the NIS+ mk_nisd command instead of an NIS+ script.
Before you can run mk_nisd, do the following:
You need the root user password of the client that you will convert into a server.
Perform any of the following to alternative procedures to configure a client as a server. These procedures create a directory with the same name as the server and create the server's initialization files which are placed in /var/nis.
Note: All servers in the same domain must have the same NIS-compatibility setting. For example, if the master server is NIS compatible, then its replicas also should be NIS compatible.
To configure a server:
wizclient1# mk_nisd -B
wizclient1# mk_nisd -B -y
wizclient1# mk_nisd -B -y -b
You must have root user authority to run mk_nisd. For more information, see the command description for mk_nisd.
Repeat the Configuring an NIS+ Server procedure on as many client machines as you require.
The sample NIS+ domain described in this section assumes that you will convert three clients to servers. You will then configure one of the servers as a root replica, another as a master of a new subdomain, and the third as a replica of the master of the new subdomain.
To have regularly available NIS+ service, you should always create root replicas. Having replicas may also speed network-request resolution because multiple servers are available to handle requests. The root replica server contains exact copies of the NIS+ tables on the root server.
Note: If the root master server is unavailable and the NIS+ domain is being served solely by a replica, you can obtain information from the NIS+ tables, but changes to the original tables can be made only when the master server is available. Also, do not run a checkpoint (nisping -C) command when the root master server is unavailable. Checkpoint inaccurately updates entries in your local tables if the master server tables are unavailable.
Replication of the master's database starts a few minutes after you perform this procedure and can take anywhere from a few minutes to a couple of hours to complete, depending on the size of your tables.
The example in this section shows the machine wizclient1 being configured as a root replica. This procedure uses the NIS+ nisserver script.
Before you can run nisserver to create a root replica, do the following:
You need:
rootmaster# nisserver -R -d wiz.com. -h wizclient1
This script sets up an NIS+ replica server for domain wiz.com.
Domain name: :wiz.com.
NIS+ server: :wizclient1
Is this information correct? (type 'y' to accept, 'n' to change)
where:
Note: Typing n causes the script to prompt you for the correct information. (See Changing Incorrect Information.)
Is this information correct? (type 'y' to accept, 'n' to change) y
This script will set up machine "wizclient1" as an NIS+
replica server for domain wiz.com. without NIS compatibility.
The NIS+ server daemon, rpc.nisd, must be running on wizclient1
with the proper options to serve this domain. Do you want to continue?
 (type 'y' to continue, 'n' to exit this script)
Note: Typing n safely stops the script. The script exits on its own if rpc.nisd is not running on the client machine.
Is this information correct? (type y' to continue, 'n' to exit this script) y

The system wizclient1 is now configured as a replica server for domain wiz.com..
The NIS+ server daemon, rpc.nisd, must be running on wizclient1 with the proper options to serve this domain. If you want to run this replica in NIS-compatibility mode, use the mk_nisd command to uncomment the appropriate lines in the /etc/rc.nfs file and set the -Y option. For example, before the command, the /etc/rc.nfs file contains:
# if [-x/usr/sbin/rpc.nisd] then;
# startsrc -s rpc.nisd
#
After running mk_nisd, the same lines appear as:
if [-x/usr/sbin/rpc.nisd] then;
startsrc -s rpc.nisd
Then, restart rpc.nisd.
Note: The mk_nisd, mk_cachemgr, mk_nispasswdd, rm_nisd, rm_cachemgr, and rm_nispasswdd commands alter the entries of daemon startup calls in /etc/rc.nfs, and they alter the default behavior of the daemon src entities. For example, if the rpc.nisd daemon is supposed to be started with the -Y option, it is not explicitly set in the /etc/rc.nfs entry for starting the rpc.nisd daemon. Instead, a chssys is executed to place the default options that are added (if any) to the daemons during startup. To verify that these options exist, use the lssrc -S -s subsystem command to show the default options.
The machine wizclient1 is now an NIS+ root replica. The new root replica can handle requests from the clients of the root domain. Since there are now two servers available to the domain, information requests can be fulfilled faster.
Repeat the Creating a Root Replica procedure for each additional server. For performance reasons, you should have no more than a few replicas per domain. Create as many replicas as is necessary to serve physically distant sites. For example, it may make sense from an organizational point of view to have two physically distant sites in the same NIS+ domain. If a root replica and the master of the domain are at the first site,network traffic will be heavy between the first site and the second site of the domain. Creating an additional root replica at the second site should reduce network traffic.
The sample NIS+ domain described in this section includes only one root replica. One of the other clients of the wiz.com. domain will be converted to a replica of the subdomain created in the next section.
This section shows you how to create the master server of a new nonroot domain. The new domain will be a subdomain of the wiz.com. domain. The hierarchical structure of NIS+ allows you to create a domain structure that parallels your organizational structure.
The example in this section shows the machine wizclient2 being converted to the master server of a new domain called subwiz.wiz.com. This procedure uses the nisserver script.
Before you can run nisserver to create a master server for a new nonroot domain:
You need:
In the following example, the new nonroot domain is called subwiz.wiz.com.
Note: Any NIS+ client can be converted to an NIS+ master server as long as it is itself in a domain above the domain it will be serving. For example, an NIS+ client in domain subwiz.wiz.com. can serve domains below it in the hierarchy, such as corp.subwiz.wiz.com.. This client cannot, however, serve the domain wiz.com., because wiz.com. is above the domain subwiz.wiz.com. in the hierarchy. Root replicas are the only exception to this rule. They are clients of the domain that they serve.
rootmaster# nisserver -M -d subwiz.wiz.com. -h wizclient2

This script sets up a nonroot NIS+ master server for domain
subwiz.wiz.com.
Domain name                         : subwiz.wiz.com.
NIS+ server             : wizclient2
NIS+ group              : admin.subwiz.wiz.com.
NIS (YP) compatibility     : OFF
Security level                      : 2=DES
Is this information correct? (type 'y' to accept, 'n' to change)
Master servers of new nonroot domains are created with the same set of default values as root servers. See Creating a Root Master Server for more information on NIS+ group, NIS compatibility, and security level.
Note: Typing n causes the script to prompt you for the correct information. (See Changing Incorrect Information.)
Is this information correct? (type 'y' to accept, 'n' to change) y


This script sets up machine "wizclient2" as an NIS+
nonroot master server for domain subwiz.wiz.com.

Do you want to continue? (type 'y' to continue, 'n' to exit this script)
Note: Typing n safely exits the script. The script will exit on its own if rpc.nisd is not running on the client machine.
Do you want to continue? (type 'y' to continue, 'n' to exit this script) y
running nissetup ...
org_dir.subwiz.wiz.com. created
groups_dir.subwiz.wiz.com. created
...
...
setting NIS+ group admin.subwiz.wiz.com. ...

The system wizclient2 is now configured as a nonroot server for domain
subwiz.wiz.com. You can now populate the standard NIS+ tables by using the
nispopulate or /usr/lib/nis/nisaddent commands.
The machine wizclient2 is now the master server of the subwiz.wiz.com. domain. The subwiz.wiz.com. domain is a subdomain of the wiz.com. domain. The machine wizclient2 is simultaneously still a client of the root domain wiz.com., and the master server of the subwiz.wiz.com. domain.
You can now populate the standard NIS+ tables on the new master server of the subwiz.wiz.com. domain.
Repeat the Creating a New Nonroot Domain procedure for changing servers to master servers of new nonroot domains on as many server machines as you require. Every new master server is a new domain. Plan your domain structure before you start creating an NIS+ namespace. See Configuration Worksheets for help with planning an NIS+ hierarchy.
After you have created a new domain, you need to populate its master server's standard NIS+ tables. You use the same procedure to populate the new master server's tables as you used to populate the root master server's tables. The major difference is that the nispopulate script is run on the new master server instead of on the root master server. The domain names and file paths or NIS server names may change as well.
The example in this procedure shows the tables of the new domain, subwiz.wiz.com., being populated.
Before you can run the nispopulate script to populate the new master server's tables, do the following:
For example, you may want to remove the following lines from the copy of your local passwd file so they will not be distributed across the namespace:
root:!:0:0::/home/root:/bin/ksh
daemon:!:1:1::/etc:
bin:!:2:2::/bin:
sys:!:3:3::/usr/sys:
adm:!:4:4::/var/adm:
uucp:!:5:5::/usr/lib/uucp:
guest:!:100:100::/home/guest:
nobody:!:4294967294:4294967294::/:
lpd:!:9:4294967294::/:
nuucp:*:6:5:uucp login user:/var/spool/uucppublic:/usr/sbin/uucp/uucico
ftp:*:200:1::/home/ftp:/usr/bin/ksh
anonymous:*:201:1::/home/ftp:/usr/bin/ksh
admin:!:202:1::/home/admin:/usr/bin/ksh
Note: The nispopulate script may fail if there is insufficient /tmp space on the system.
If you are populating from files, you need:
If you are populating from NIS maps, you need:
Note: The NIS domain name is case-sensitive, while the NIS+ domain name is not.
The example in this section shows you what to type to populate the tables of the new domain, subwiz.wiz.com.
Note: Run this script on the new domain's master server, not the root master server.
There are two methods for populating the master server tables on the new master server:
Run either method in a scrolling window because the output may otherwise scroll off the screen.
To populate master server tables from files, type the following command:
wizclient2# nispopulate -F -p /nis+files -d subwiz.wiz.com.
To populate master server tables from NIS maps, type the following command:
wizclient2# nispopulate -Y -d subwiz.wiz.com. -h businessmachine \
  -a IP_addr_of_NIS_server -y business.wiz.com
Just as you did in the wiz.com. domain, to have regularly available NIS+ service, you should always create replicas. Having replicas may also speed network-request resolution since multiple servers are available to handle requests. The replica server contains exact copies of the NIS+ tables on the master server of your new domain. Replication of the master's database starts a few minutes after you perform this procedure and can take anywhere from a few minutes to a couple of hours to complete, depending on the size of your tables.
You use the same procedure to create a replica as you do to create a root replica. The major difference between creating the root replica and this replica is that the machine you are going to convert to a replica will remain a client of the domain above the one it will be serving as a replica. This example shows you only what you would type to create a replica for the new domain. For the rest of the script's output, see Creating a Root Replica.
Before you can run nisserver to create a replica:
Run the nisserver -R command as root user on the NIS+ domain's master server. For example:
wizclient2# nisserver -R -d subwiz.wiz.com. -h wizclient3
where:
Notice that this machine is still a client of the wiz.com. domain and not a client of the subwiz.wiz.com. domain. See Creating a Root Replica for the rest of this script's output.
Once the master server's tables have been populated from files or NIS maps, you can initialize an NIS+ client machine. This section shows you how to initialize an NIS+ client in the new domain using the nisclient script with default settings. The NIS+ client machine is a different workstation than the NIS+ master server.
You use the same procedure to initialize a client in the new domain as you do to initialize a client in the root domain. This example shows you only what you would type to initialize a client for the new domain. For the rest of the script's output, see Initializing a New Client Machine.
Before you can use the nisclient script to initialize a user, do the following:
You need:
Type the following command as root user to initialize the new client on the new client machine.
subclient1# nisclient -i -d subwiz.wiz.com. -h wizclient2 -a wizclient2ipaddress
where:
See Initializing a New Client Machine for the rest of this script's output.
You use the same procedure (nisclient) to initialize a user in the new domain as you do to initialize a user in the root domain. All users must become NIS+ clients. This example shows you only what you would type to initialize a user for the new domain. For the rest of the script's output, see Initializing NIS+ Client Users.
Before you can use the nisclient script to initialize a user, do the following:
You need:
To become an NIS+ user, type the following command while logged in as the user.
user2prompt% nisclient -u
See Initializing NIS+ Client Users for the rest of this script's output.
The following table summarizes the
actual commands that you typed to create the sample namespace. The
prompt preceding each command indicates on which machine the command should be
typed.
| Creating the Sample Namespace: Command Summary | |
|---|---|
| Tasks | Commands |
| Set environment path to include /usr/lib/nis. |
PATH=$PATH:/usr/lib/nis; export PATH |
| Create root master server for wiz.com. domain. |
rootmaster# nisserver -r -d wiz.com. |
| Populate the root master server's NIS+ tables--from files or from NIS maps. |
rootmaster# nispopulate -F \
  -p /nis+files -d wiz.com.
or
rootmaster# nispopulate -Y -d wiz.com. \ -h corporatemachine \ -a 130.48.58.111 \ -y corporate.wiz.com |
| Add additional members to the admin group. |
rootmaster# nisgrpadm -a admin.wiz.com. \ topadmin.wiz.com. secondadmin.wiz.com. |
| Make a checkpoint of the NIS+ database. |
rootmaster# nisping -C org_dir.wiz.com. |
| Initialize an NIS+ client machine in the wiz.com. domain. |
wizclient1# nisclient -i -d wiz.com. \ -h rootmaster -a ipaddress |
| Initialize user as an NIS+ client. |
wizclient1user1prompt% nisclient -u |
| Convert NIS+ client to NIS+ server, without or with NIS compatibility or with NIS and DNS. |
wizclient1# mk_nisd [-I|-B|-N] or
wizclient1# mk_nisd -y [-I|-B|-N] or
wizclient1# mk_nisd -y -b [-I|-B|-N] |
| Create a root replica. |
rootmaster# nisserver -R -d wiz.com. \ -h wizclient1 |
| Convert a server to a nonroot master server of the subwiz.wiz.com. domain. |
rootmaster# nisserver -M -d subwiz.wiz.com. \ -h wizclient2 |
| Populate the new master server's NIS+ tables--from files or from NIS maps. |
wizclient2# nispopulate -F -p /nis+files \
  -d subwiz.wiz.com.
or
wizclient2# nispopulate -Y -d subwiz.wiz.com. \ -h businessmachine -a 130.48.58.242 \ -y business.wiz.com |
| Create a master server replica. |
wizclient2# nisserver -R -d subwiz.wiz.com. \ -h wizclient3 |
| Initialize an NIS+ client in the subwiz.wiz.com. domain. |
subclient1# nisclient -i -d subwiz.wiz.com. \ -h wizclient2 \ -a ipaddress |
| Initialize user as an NIS+ user. |
subclient1user2prompt% nisclient -u |