This section assumes that you have a basic understanding of the NIS+ security system, especially of the role that credentials play in that system (see Chapter 7, Security for this information).
This section provides the following information:
NIS+ uses an authentication system of credentials to prevent someone from assuming some other user's identity. That is, it prevents someone with root privileges on one machine from using the su command to assume the identity of a second user (who is either not logged in at all or logged in on another machine) and then accessing NIS+ objects with the second user's NIS+ access privileges.
Note: NIS+ cannot prevent someone who knows another user's login password from assuming that other user's identity and the other user's NIS+ access privileges. Likewise, NIS+ cannot prevent a user with root privileges from assuming the identity of another user who is currently logged in on the same machine.
See Chapter 7, Security for a description of how NIS+ credentials and authentication work with authorization and access rights to provide security for the NIS+ namespace.
To understand how DES credentials are created and how they work, you need to distinguish between the credential itself and the information that is used to create and verify it, defined as follows:
For the authentication of credentials process to work correctly, the following components must be in place:
The authentication process has three phases:
These three phases are described in detail in the following subsections.
Before an NIS+ principal logs in, an NIS+ administrator must create DES credential information for that principal (user or machine). (NIS+ administrators should use the nisclient script to create credential information for users, as described in Using NIS+ Setup Scripts.) The administrator must:
When a principal logs in to the system, the following happens:
Attention: If a principal's login password is different from their Secure RPC password, keylogin cannot decrypt it. Either the cannot decrypt message displays or the command fails without a message. For a discussion of this problem, see Secure RPC Password versus Login Password.
Note: For added security, users should be cautioned to perform an explicit keylogout when they cease work. If they also log out of the system, they need only log back in when they return.
When an NIS+ principal requests access to an NIS+ object, the NIS+ software performs a multistep process to authenticate that principal:
NIS+ gets the user's DES credential from the cred table of the user's home domain. The encrypted private key is decrypted with the user's password and saved by the keyserver.
If the time stamp is within the window limit, the server checks to see if the time stamp is greater than the one previously received from the principal. This ensures that NIS+ requests are handled in the correct order.
Requests that have a time stamp equal to the previous one are rejected with an error message. This ensures that a replayed request is not acted on twice. For example, if the time stamp is 9:00am and the most recently received request from this principal also had a time stamp of 9:00am, this request is rejected.
If the time stamp is within the window limit, and later than the previous request from that principal, the server accepts the request.
A DES credential consists of the following:
The secure RPC netname of the DES credential is used to identify the NIS+ principal. (Remember that an NIS+ principal name always has a trailing dot, while a secure RPC netname never does.) Every secure RPC netname contains three components:
These components are further illustrated in the following table.
| Secure RPC Netname Format | ||||
|---|---|---|---|---|
| Principal | Prefix | Identifier | Domain | Example |
| User | unix | UID | Domain containing user's password entry and the DES credential itself | unix.24601@sales.wiz.com |
| Workstation | unix | host name | Domain name returned by executing the domainname command on that workstation | unix.machine7@sales.wiz.com |
The verification field is used to make sure the credential is not a forgery. Field contents are generated from the credential information stored in the cred table.
The verification field is composed of:
To generate its DES credential, the principal depends on the keylogin command, which must have been executed before the principal tries to generate its credential. The keylogin command (often referred to as a keylogin) is executed automatically when an NIS+ principal logs in.
Note: If the principal's login password is different from the principal's Secure RPC password, a successful keylogin cannot be performed. See Secure RPC Password versus Login Password for a discussion of this situation.
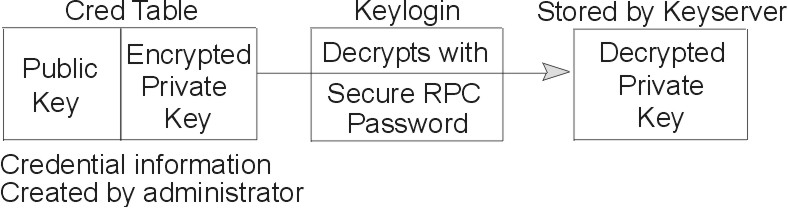
The purpose of keylogin is to give the principal access to the principal's private key. keylogin obtains the principal's private key from the cred table, decrypts it with the principal's secure RPC password (remember that the private key was originally encrypted with the principal's Secure RPC password), and stores it locally with the keyserver for future NIS+ requests.
Figure 6-1. keylogin Generating a Principal's Private Key. This illustration shows cred table entries created by an administrator (the public key and the encrypted private key), which are decrypted by keylogin with the Secure RPC password, then stored by keyserver with the decrypted private key.
|
To generate its DES credential, the principal still needs the public key of the server to which it will send the request. This information is stored in the principal's directory object. Once the principal has this information, it can create the verification field of the credential.
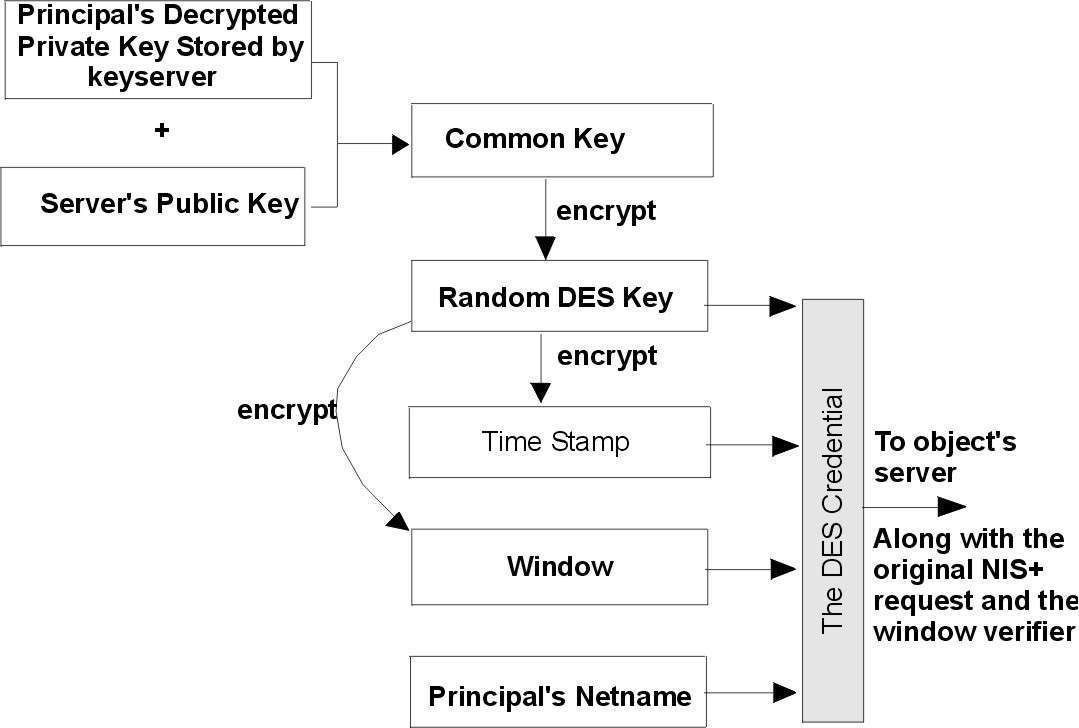
First, the principal generates a random DES key for encrypting various credential information. The principal uses its own private key (stored in the keyserver) and the server's public key to generate a common key that is used to generate and encrypt the random DES key. It then generates a time stamp that is encrypted with the DES key and combines it with other credential-related information into the verification field.
Figure 6-2. Creating the DES Credential. This flowchart shows how DES credentials are generated. The decrypted private key and the server's public key combine to create the common key, which is encrypted with a random DES key and time stamped. The DES key, time stamp, window, and netname, become the DES credential.
 |
When a principal's login password is different from his or her secure RPC password, keylogin cannot decrypt it at login time because keylogin defaults to using the principal's login password, and the private key was encrypted using the principal's secure RPC password.
When this occurs, the principal can log in to the system, but for NIS+ purposes, the principal is placed in the authorization class of nobody because the keyserver does not have a decrypted private key for that user. Because most NIS+ environments are set up to deny create, destroy, and modify rights to the nobody class for most NIS+ objects, this results in permission denied errors when the user tries to access NIS+ objects.
To be placed in one of the other authorization classes, a user in this situation must explicitly run the keylogin program and give the principal's secure RPC password when keylogin prompts for a password. (See the The keylogin Process.)
Note: In this context, network password is sometimes used as a synonym for secure RPC password. When you are prompted for your network password, type your secure RPC password.
An explicit keylogin provides a temporary solution only for the current login session. The keyserver now has a decrypted private key for the user, but the private key in the user's cred table is still encrypted using the user's secure RPC password, which is different from the user's login password. The next time the user logs in, the same problem recurs. To permanently solve the problem, the user needs to re-encrypt the private key in the cred table to one based on the user's login ID rather than the user's secure RPC password by running chkey -p as described in Changing Keys for an NIS+ Principal.
To permanently solve problems related to a difference in secure RPC password and login password, the user (or an administrator acting for the user) must perform these steps:
Occasionally, you may find that even though you have created the appropriate credentials and assigned the appropriate access rights, some principal requests are still denied. The most common cause of this problem is the existence of stale objects with old versions of a server's public key. You can usually correct this problem by:
This section describes where credential-related information is stored throughout the NIS+ namespace.
Credential-related information, such as
public keys, is stored in many locations throughout the namespace. NIS+
updates this information periodically, depending on the time-to-live values of
the objects that store it, but sometimes, between updates, it gets out of
sync. As a result, you may find that operations that should work, do
not. The following table lists all the objects, tables, and files that
store credential-related information and how to reset them.
| Where Credential-Related Information Is Stored | ||
|---|---|---|
| Item | Stores | To Reset or Change |
| cred table | NIS+ principal's public key and private key. These are the master copies of these keys. | Use nisaddcred to create new credentials; it updates existing credentials. An alternative is chkey. |
| directory object | A copy of the public key of each server that supports it. | Run the /usr/lib/nis/nisupdkeys command on the directory object. |
| keyserver | The secret key of the NIS+ principal that is currently logged in. | Run keylogin for a principal user or keylogin -r for a principal workstation. |
| NIS+ daemon | Copies of directory objects, which in turn contain copies of their servers' public keys. | Kill the rpc.nisd daemon and the cache manager.
For example:
stopsrc -s rpc.nisd
stopsrc -s nis_cachemgr
Then remove NIS_SHARED_DIRCACHE from /var/nis. Then restart both. For example: startsrc -s rpc.nisd startsrc -s nis_cachemgr |
| Directory cache | A copy of directory objects, which in turn contain copies of their servers' public keys. | Kill the NIS+ cache manager and restart it. The -i
option resets the directory cache from the cold-start file and restarts the
cache manager.
stopsrc -s nis_cachemgr startsrc -s nis_cachemgr -a "-i" |
| cold-start file | A copy of a directory object, which in turn contains copies of its servers' public keys. | On the root master, kill the NIS+ daemon and restart it. The
daemon reloads new information into the existing NIS_COLD_START
file.
On a client workstation, first remove the NIS_COLD_START and NIS_SHARED_DIRCACHE files from /var/nis, and use stopsrc -s nis_cachemgr to kill the cache manager. Then re-initialize the principal with nisinit -c. The principal's trusted server reloads new information into the workstation's NIS_COLD_START file. Start the nis_cachemgr using startsrc -s nis_cachemgr. |
| passwd table | A user's password. | Use the passwd command to change the password in the NIS+ passwd table and update it in the cred table. |
| passwd file | A user's password or a workstation's root user password. | Use the passwd command, whether logged in as root user or as yourself, whichever is appropriate. |
Credential information for principals is stored in a cred table, one of the standard NIS+ tables. Each domain has one cred table, which stores the credential information of client workstations that belong to that domain and client users who are allowed to log in to them. Cred tables are located in each domain's org_dir subdirectory.
Attention: Never link a cred table. NIS+ does not operate correctly with linked cred tables. Each org_dir directory should have its own cred table. Do not use a link to another org_dir cred table.
For users, the cred table stores LOCAL credential information for all users who are allowed to log in to any of the machines in the domain. The cred table also stores DES credential information for those users who have the domain as their home domain.
You can view the contents of a cred table with the niscat command, described in Administering NIS+ Tables.
The cred table has five columns:
| Cred Table Credential Information | |||||
|---|---|---|---|---|---|
| NIS+ Principal Name | Authentication Type | Authentication
Name | Public Data | Private Data | |
| Column Name | cname | auth_type | auth_name | public_data | private_data |
| User | Fully qualified principal name | LOCAL | UID | GID list | |
| Machine | Fully qualified principal name | DES | Secure RPC netname | Public key | Encrypted Private key |
The Authentication Type column determines the authentication types of values found in the other four columns:
You can use several methods to create and administer credential information:
When used to create local credential information, nisaddcred extracts the principal user's UID (and GID) from the principal's login record and places it in the domain's cred table.
When used to create DES credential information, nisaddcred goes through a two-part process:
To encrypt the private key, nisaddcred needs the principal's secure RPC password. When the nisaddcred command is invoked with the des argument, it prompts the principal for a secure RPC password. Normally, this password is the same as the principal's login password. (If it is different, the user must perform additional steps when logging in, as described in Secure RPC Password versus Login Password.)
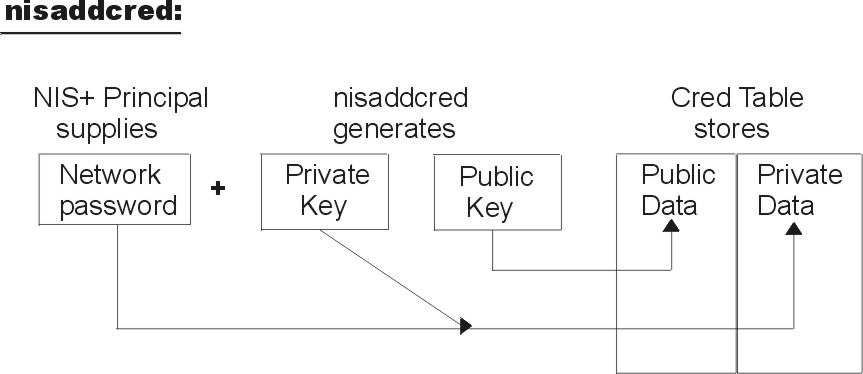
The nisaddcred command generates a pair of random, but mathematically related 192-bit authentication keys using the Diffie-Hellman cryptography scheme. These keys are called the Diffie-Hellman key-pair, or simply, key-pair.
One of these keys is the private key, and the other is the public key. The public key is placed in the public data field of the cred table. The private key is placed in the private data field, but only after being encrypted with the principal's secure RPC password.
Figure 6-3. How the nisaddcred Command Creates a Principal's Keys. This illustration shows how the Principal's network password and nisaddcred's private key are stored in cred table's private data. The public key generated by nisaddcred is stored in the table's public data.
 |
The principal's private key is encrypted as a security precaution because the cred table, by default, is readable by all NIS+ principals, even unauthenticated ones.
When creating credential information, you will often have to enter a principal's secure RPC netname and principal name. Each has its own syntax:
If a secure RPC netname identifies a user, it requires the user's UID. If it identifies a workstation, it requires the workstation's host name. (When used with the nisaddcred command, it is always preceded by the -p flag.)
A secure RPC netname always begins with the unix (all lowercase) prefix and ends with a domain name. However, because it follows the secure RPC protocol, the domain name does not contain a trailing dot.
Whether it identifies a client user or a client workstation, it begins with the principal's name, followed by a dot and the complete domain name, ending in a dot. (When the secure RPC netname is used with nisaddcred to create credential information, it is always preceded by the -P flag. When used to remove credential information, it does not use the -P flag.)
When a namespace is first set up, credential information is created first for the administrators who will support the domain. Once they have credential information, these administrators can create credential information for other administrators, client workstations, and client users.
When you try to create your own credential information, you find that you cannot create your own credential information unless you have Create rights to your domain's cred table,. However, if the NIS+ environment is properly set up, you cannot have such rights until you have credentials. You can remove the loop in one of two ways:
OR
In either case, your credential information is created by another NIS+ principal. To create your own credential information, follow the instructions in Creating Credential Information for NIS+ Principals.
Credential information for NIS+ principals can be created any time after their domain has been set up; in other words, once a cred table exists.
To create credential information for an NIS+ principal:
Once these conditions are met, you can use the nisaddcred command with both the -p and -P flags:
For local credentials, use the following example:
nisaddcred -p uid -P principal-name local
For DES credentials, use the following example:
nisaddcred -p secureRPCnetname -P principal-name des
Remember the following guidelines when you create credential information:
The following example creates both LOCAL and DES credential information for an NIS+ user named morena who has a UID of 11177. She belongs to the sales.wiz.com. domain, so this example enters her credential information from a principal machine of that domain:
salesclient# nisaddcred -p 11177 -P morena.sales.wiz.com. local
salesclient# nisaddcred -p unix.11177@sales.wiz.com -P morena.sales.wiz.com. des
Adding key pair for unix.11177@sales.wiz.com (morena.sales.wiz.com.).
Enter login password:
The response to the Enter login password: prompt is morena's login password. If you do not know her login password, you can use a substitute password that she can later change using chkey. The following table shows how another administrator, whose credential information you create using a dummy password, can then use chkey to change his or her own password. In this example, you create credential information for an administrator named eiji who has a UID of 119. eiji belongs to the root domain, so you would enter his credential information from the root master server which is named rmaster.
| Creating Administrator Credentials: Command Summary | |
|---|---|
| Tasks | Commands |
| Create LOCAL credential information for eiji. |
rmaster# nisaddcred \ -p 119 -P eiji.wiz.com. local |
| Create DES credential information for eiji. |
rmaster# nisaddcred \
  -p unix.119@wiz.com  \
  -P eiji.wiz.com. des
Adding key pair for unix.119@wiz.com (eiji.wiz.com.). |
| Type dummy password for eiji. |
Enter eiji's login password: |
| Re-enter dummy password. |
nisaddcred: WARNING: password differs from login passwd. Retype password: |
| Inform eiji of the dummy password that you used. | |
| eiji logs in to rmaster. |
rmaster login: eiji |
| eiji enters real login password. |
Password: |
| eiji gets error message but is allowed to log in anyway. |
Password does not decrypt secret key for unix.119@wiz.com. |
| eiji runs keylogin. |
rmaster% keylogin |
| eiji types dummy password. |
Password: dummy-password |
| eiji runs chkey -p. |
rmaster% chkey -p Updating nisplus publickey database Generating new key for 'unix.119@wiz.com'. |
| eiji types real login password. |
Enter login password: |
| eiji re-types real login password. |
Retype password: Done. |
If you were creating credential information using the commands shown in the previous table, you would first create eiji's credential information in the usual way, but using a dummy login password. NIS+ would warn you and ask you to retype it. When you did, the operation would be complete. The domain's cred table would contain eiji's credential information based on the dummy password. The domain's passwd table (or /etc/passwd file), however, would still have his login password entry so that he can log in to the system.
Then, eiji would log in to the domain's master server, typing his correct login password (since the login procedure checks the password entry in the passwd table or /etc/passwd file). From there, eiji would first run keylogin, using the substitute password (since a keylogin checks the cred table), and then use the chkey -p command to change the cred entry to the actual table entry.
The two previous examples created credential information for a principal user while the principal user was logged in to the master server of the principal's home domain. However, if you have the proper access rights, you can create credential information in another domain by appending the domain name to this syntax:
For LOCAL credentials, use the following example:
nisaddcred -p uid -P principal-name local domain-name
For DES credentials, use the following example:
nisaddcred -p SecureRPC-netname -P principal-name des domain-name
The following example first creates LOCAL and DES credential information for an administrator named chou in her home domain, which happens to be the root domain. It then adds her LOCAL credential information to the sales.wiz.com. domain. Chou's UID is 11155. This command is entered from the root master server.
rmaster# nisaddcred -p 11155 -P chou.wiz.com. local
rmaster# nisaddcred -p unix.11155@wiz.com -P chou.wiz.com. des
Adding key pair for unix.11155@wiz.com (chou.wiz.com.).
Enter login password:

rmaster# nisaddcred -p 11155 -P chou.wiz.com. local sales.wiz.com.
LOCAL credential information maps a UID to an NIS+ principal name. Although an NIS+ principal that is a client user can have different user IDs in different domains, it can have only one NIS+ principal name. So, if an NIS+ principal such as chou logs in from a domain other than her home domain, not only should she have a password entry in that domain, but also a LOCAL credential in that domain's cred table.
The following example creates credential information for a principal workstation. Its host name is starshine1 and it belongs to the root domain. Therefore, its credential information is created from the root master server. In this example, you create credential information (while logged in as root user to the root master). However, if you already have valid credential information and the appropriate access rights, you can create them while logged in as yourself.
rmaster# nisaddcred -p unix.starshine1@wiz.com -P starshine1.wiz.com. des
Adding key pair for unix.starshine1@wiz.com
       (starshine1.wiz.com.).
Enter starshine1.wiz.com.'s root login password:
Retype password:
The correct response to the password prompt is the principal workstation's root user password. You could use a substitute password that is later changed by someone logged in as root user to that principal workstation.
The following sections describe how to administer existing credential information using the nisaddcred command. You must have create, modify, read, and destroy rights to the cred table to perform these operations.
Update your own credential information using the nisaddcred command while logged in as yourself:
# nisaddcred des
# nisaddcred local
To update credential information for someone else, perform the same procedure that you use to create that person's credential information.
The nisaddcred command removes a principal's credential information, but only from the local domain where the command is run.
To completely remove a principal from the entire system, you must explicitly remove that principal's credential information from the principal's home domain and from all domains where the principal has LOCAL credential information.
To remove credential information, you must have modify rights to the local domain's cred table. Use the -r option and specify the principal with a full NIS+ principal name:
# nisaddcred -r principal-name
The following two examples remove the LOCAL and DES credential information of the administrator morena.wiz.com. The first example removes both types of credential information from her home domain (wiz.com.). The second example removes her LOCAL credential information from the sales.wiz.com. domain. Note that they are each entered from the appropriate domain's master servers.
rmaster# nisaddcred -r morena.wiz.com.
salesmaster# nisaddcred -r morena.wiz.com.
To verify that the credential information was indeed removed, run nismatch on the cred table, as shown below. For more information about nismatch, see Administering NIS+ Tables.
rmaster# nismatch morena.wiz.com. cred.org_dir
salesmaster# nismatch morena.wiz.com. cred.org_dir