
This section provides general guidelines and recommendations for designing the final NIS+ namespace for your site:
When designing the namespace, do not worry about limitations imposed by the transition from NIS. You can modify your NIS+ domain later, once you know what your final NIS+ configuration will look like.
Select the model of information administration, such as the domain structure, that your site will use. Without a clear idea of how information at your site will be created, stored, used, and administered, it is difficult to make the design decisions suggested in this section. You could end up with a design that is more expensive to operate than necessary. You also run the risk of designing a namespace that does not suit your needs. Changing the namespace design after it has been set up is costly.
Designing the NIS+ namespace is one of the most important tasks you can perform, since changing the domain structure after NIS+ has been set up is a time-consuming, complex job. It is complex because information, security, and administration policies are woven into the domain structure of the namespace. Rearranging domains would require rearranging information, reestablishing security, and recreating administration policies.
When designing the structure of an NIS+ namespace, consider the following factors, which are discussed in the following sections:
The main benefit of an NIS+ domain hierarchy is that it allows the namespace to be divided into more easily managed components. Each component can have its own security, information management, and administration policies. It is advisable to have a hierarchy if the number of clients you have exceeds 500, if you want to set up different security policies for a set of users, or if you have geographically distributed sites.
Unless there is a need for a domain hierarchy, not having a hierarchy simplifies your transition to NIS+ because the NIS+ servers for each subdomain are not part of the subdomain that they serve, with the exception of the root domain. The NIS+ servers are in the parent domain of the subdomain they serve. This relationship of server to subdomain creates problems for applications that expect the servers to be able to get their name service data from the subdomain. For example, if a subdomain NIS+ server is also an NFS server, then the server would not get its netgroups information from the subdomain, but instead retrieve the information from its domain, which is the domain above the subdomain; this can be confusing. Another example of when a hierarchy could cause problems would be where the NIS+ server was also used by users to log in remotely and to execute certain commands that they could not execute from their own workstations. If you have only a single root domain, you will not have these problems because NIS+ root servers live in the domain that they serve.
When all users are in the same NIS domain, they are directly visible to each other without using fully qualified names. Creating an NIS+ hierarchy, however, puts users in separate domains, which means that the users in one domain are not directly visible to users in another domain unless you use fully qualified names or paths.
For example, if there are two subdomains, sales.wiz.com and factory.wiz.com, created out of the earlier wiz.com domain, then for user juan in the sales.wiz.com domain to be able to send mail to user myoko in factory.wiz.com, he would have to specify her name as myoko@hostname.factory.wiz.com (or myoko@hostname.factory) instead of just myoko, as was sufficient when they were in the same domain. Remote logins also require fully qualified names between domains.
You could use the table path to set up connections between tables in one domain and another domain, but to do so would negate the advantages of having a domain hierarchy. You would also be reducing the reliability of the NIS+ service because now clients would have to depend upon the availability of not only their own home domains, but also of other domains to which their tables are pathed. Using table paths may also slow request-response time.
If you are unfamiliar with domain hierarchies, see Chapter 4, NIS+ Namespace and Structure before designing your domain hierarchy. It describes NIS+ domain structure, information storage, and security.
Once you are familiar with the components of a domain hierarchy, make a diagram of how you expect the hierarchy to look when you are finished. The diagram will be a useful reference when you are in the midst of the setup procedure. At a minimum, you need to consider the following issues:
One of the major benefits of NIS+ is its capability of dividing the namespace into smaller, manageable parts. You could create a hierarchy of organizations, such as those of the hypothetical corporation, Wizard, Inc., shown in the following figure.
Figure 3-1. Organizing a Hierarchy by Logical Location. An example of organizing a hierarchy by logical location. It shows wiz.com. domain and its subdomains called sales.wiz.com. and factory.wiz.com.; sales.wiz.com. has subdomains called big.sales.wiz.com. and small.sales.wiz.com.
|
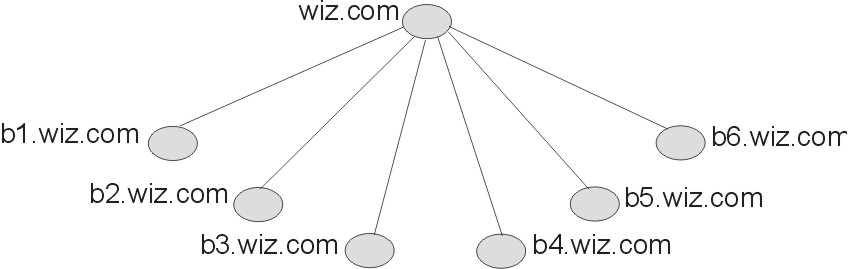
You could also organize the hierarchy by buildings instead of organizations, as shown in the following figure.
Figure 3-2. Organizing a Hierarchy by Physical Location. An example of organizing a hierarchy by physical location. It shows the wiz.com. domain with a subdomain for each building (b1.wiz.com through b6.wiz.com.).
 |
The scheme you select depends primarily on how you prefer to administer the namespace and how clients tend to use the namespace. For example, if clients of factory.wiz.com are distributed throughout the buildings of Wizard, Inc., you should not organize the namespace by building. Since the clients would constantly need to have access to other domains, you would need to add their credentials to the other domains and you would increase traffic flow through the root master server. A better scheme would be to arrange clients by organization. On the other hand, building-sized domains are immune to the reorganizations that require organization-based domains to be restructured.
You are not limited by the physical layout of the network, since an NIS+ namespace does not have to be congruent with the physical network, except where it has to support NIS clients. The number of domains your namespace needs depends on the kind of hierarchy you select.
Consider future expansion plans. Will today's NIS+ root domain be beneath another NIS+ domain in the future? Estimate the need for future domains in the namespace and design a structure that can accommodate them without disruption.
Consider whether the NIS+ namespace will be connected to higher domains, such as those of the Internet or DNS. If you currently use NIS under a DNS hierarchy, do you want to replace only the NIS domains, or do you want to replace the entire company wide DNS/NIS structure with an NIS+ namespace?
In the organizational and building-based domain hierarchies illustrated earlier, are all the clients placed in domains beneath the root domain? Or do some belong to the root domain? Is the purpose of the root domain to act only as the root for its subdomains or will it support its own group of clients? You could place all clients in the lowest layer of domains and only those used for administration in the root and any intermediate domains. For example, if you implemented the organizational domain plan, all clients would belong to the big.sales.wiz.com, small.sales.wiz.com, and factory.wiz.com domains, and only clients used for administration would belong to the wiz.com and sales.wiz.com domains.
Or you could place the clients of general-purpose departments in higher-level domains. For example, if the domain is organized by building, you could put the clients of the Facilities Department in the wiz.com domain. It is not recommended that you do so, however, because the root domain should be kept relatively unpopulated.
The current NIS+ implementation is optimized for up to 1000 NIS+ clients per domain and for up to 10 replicas per domain. Such a domain would typically have 10,000 table entries. The limitations come from the current server discovery protocol. If you have more than 1000 NIS+ clients, you should divide your namespace into different domains and create a hierarchy.
Creating a hierarchy, however, may introduce unnecessary complexity. You may still prefer to create larger domains rather than a hierarchy because one large domain requires less administration than multiple smaller domains do. Larger domains need fewer skilled administrators to service them, since tasks can be automated more readily (with scripts you create), thus lowering the administrative expense. Smaller domains provide better performance, and you can customize their tables more easily. You also achieve greater administrative flexibility with smaller domains.
NIS+ was designed to handle multiple levels of domains. Although the software can accommodate almost any number of levels, a hierarchy with too many levels is difficult to administer. For example, the names of objects could become long and unwieldy. Consider 20 to be the limit for the number of subdomains for any one domain and limit the levels of the NIS+ hierarchy to 5.
Typically, you will run the namespace at security level 2. However, if you plan to use different security levels for different domains, you should identify them now. Planning NIS+ Security Measures provides more information about security levels.
Any one domain should have no more than 10 replicas because of the increased network traffic and server load that occur when information updates are propagated to the replicas. Determining the number of replicas a domain requires depends on other factors as well, such as:
You should create a minimum of two servers (one master and one replica) for every domain and at least one replica for every physical location. You do not need a replica for every subnet. NIS clients do not have access to servers that are not on the same subnet. The only exceptions are the NIS clients, which can use ypinit to specify a list of NIS servers. The netmask number in these cases would have to be set appropriately.
One way you can have a sufficient number of replicas per domain without using a multiplicity of machines is to create multihomed servers. A multihomed server is a machine with multiple Ethernet or network interfaces. A multihomed server can serve multiple subnets in a domain.
If the domain hierarchy that you design spans a wide area network (WAN) link, it is recommended that you replicate the domain on either side of the WAN link--with a master server on one side and a replica on the other. This could possibly enable clients on the other side of the link to continue with NIS+ service even if the WAN link were temporarily disabled. Putting servers on either side of a WAN, however, changes the structure of a namespace that is organized by group function rather than by physical layout, since the replica might physically reside within the geographic perimeter of a different domain.
Geographically dispersed organizations may determine that organizing their domain hierarchy by functional groups would cause a domain to span more than one time zone. It is strongly recommended that you do not have domains that span multiple time zones. If you do need to configure a domain across time zones, be aware that a replica's time will be taken from the master server, so the database updates will be synchronized properly, using Greenwich mean time (GMT). This may cause problems if the replica machine is used for other services that are time critical. To make domains across time zones work, the replica's timezone has to be locally set to the master server's time zone when you are installing NIS+. Once the replica is running, some time-critical programs may run properly and some may not, depending on whether these programs use universal or local time.
Use a model of local administration within centralized constraints for managing the information in an NIS+ namespace. Information should be managed, as much as possible, from within its home domain, but according to guidelines or policies set at the global namespace level. This provides the greatest degree of domain independence while maintaining consistency across domains.
First, choose names that are descriptive. For example, Sales is considerably more descriptive than BW23A. Second, choose short names. To make your administrative work easier, avoid long names such as EmployeeAdministrationServices.WizardCorporation.
A domain name is formed from left to right, starting with the local domain and ending with the root domain, as shown in the following figure. Unlike NIS, an NIS+ domain name is not case sensitive.
Figure 3-3. Syntax of Domain and Subdomain Names. This illustration shows the name sales.wiz.com. 'sales' is a subdomain in wiz.com. 'wiz.com.' is the root domain.
 |
The root domain must always have at least two labels and must end in a dot. The second label can be an Internet domain name, such as com.
Also consider implications of particular names for electronic mail domains, both within the company and over the Internet.
Depending on the migration strategy chosen, a viable alternative could be to change domain names on NIS to the desired structure, then migrate to NIS+ domain-by-domain.
Because NIS+ can have a domain hierarchy while NIS has a flat domain space, changing to NIS+ can have effects on your mail environment. With NIS, only one mail host is required. If you use a domain hierarchy for NIS+, you may need one mail host for each domain in the namespace because names in separate domains may no longer be unique.
Therefore, the e-mail addresses of clients who are not in the root domain may change. As a general rule, client e-mail addresses can change when domain names change or when new levels are added to the hierarchy.
NIS+ provides several sendmail enhancements to make the task easier. In addition, NIS+ provides a sendmailvars table. The sendmail program first looks at the sendmailvars table (see the following table), then examines the local sendmail.cf file.
Note: Be sure that mail servers reside in the NIS+ domain whose clients they support. For performance reasons, do not use paths to direct mail servers to tables in other domains.
Consider the impact of the new mail addresses on DNS. You may need to adjust the DNS MX (multiplex) records.
Each NIS+ domain is supported by a set of NIS+ servers. The servers store the domain's directories, groups, and tables, and answer requests for access from users, administrators, and applications. Each domain is supported by only one set of servers. However, a single set of servers can support more than one domain.
Remember that a domain is not an object, but a reference to a collection of objects. Therefore, a server that supports a domain is not actually associated with the domain but with the domain's directories. A domain consists of the following directories:
Any workstation that is installed with the appropriate NIS+ file sets can be an NIS+ server as long as it has available file system space. The software for both NIS+ servers and clients is included in the AIX 5.1 product. Therefore, any workstation that has a current operating system release installed can become a server or a client, or both.
When you select the servers that will support the NIS+ namespace, consider the following factors, discussed in the following sections:
When you select servers, you must differentiate between the requirements imposed by the NIS+ service and those imposed by the traffic load of your namespace.
The NIS+ service requires you to assign at least one server, the master, to each NIS+ domain. (An NIS+ server is capable of supporting more than one domain, but use the one server for one domain configuration in small namespaces or testing situations.) How many other servers a domain requires is determined by the traffic load, the network configuration, and whether NIS clients are present.
Your anticipated traffic loads determine the total number of servers used to support the namespace, how much storage and processing speed each requires, and whether a domain needs replicas to ensure its availability.
Unless you find you must rebalance traffic loads, it is a good idea to assign one master server to each domain in the hierarchy.
If certain domains must always be available,add two or more replicas to them. Two replicas allow requests to still be answered even if one of the replicas is damaged. Requests may not be answered in a timely manner if a master has only one replica and that replica is being repaired or updated. A domain with only one replica loses 50 percent of its load capacity when the replica is down. Always add at least one replica to a domain. In small to medium domains, configurations with two to four replicas are normal.
In organizations with many distributed sites, each site often needs its own subdomain. Typically, the subdomain master is placed in a higher-level domain. As a result, there can be a great deal of traffic between point-to-point links. Creating local replicas can speed request response and minimize point-to-point traffic across the link. In this configuration, lookups may be handled locally.
NIS+ master servers require fewer replicas than NIS servers did, since NIS+ does not depend on broadcasts on the local subnet.
Putting replicas on both sides of a weak network link (such as WAN links) is recommended. If the link breaks and the networks are decoupled, both sides of the network can still obtain service.
Do not put more than 10 replicas on one domain. If you can, put one on each subnet; otherwise, distribute the servers as best you can and optimize for the best performance. You do not need NIS+ servers on every subnet, unless they support NIS clients. In such cases, you may want to install NIS+ servers on multihomed machines.
Try to keep fewer than 1000 clients in a domain. NIS+ clients present a higher load on servers than NIS clients do. A large number of clients served by only a few servers may impact network performance.
How much disk space you need depends on four factors:
BOS software requires at least 32 MB of disk space. You must also consider the disk space consumed by other software the server may use. For more details on the BOS installation and requirements, see the AIX Version 4.3 Installation Guide.
Although NIS+ is part of the operating system distribution, it is not automatically installed in the base installation. NIS+ directories, groups, tables, and client information are stored in /var/nis. The /var/nis directory uses about 5 KB of disk space per client. For example purposes only, if a namespace has 1000 clients, /var/nis requires about 5 MB of disk space. However, because transaction logs (also kept in /var/nis) can grow large, you may want additional space per client--an additional 10-15 MB is recommended. In other words, for 1000 clients, allocate 15 to 20 MB for /var/nis. You can reduce this if you checkpoint transaction logs regularly.
If you plan to use NIS+ concurrently with NIS, allocate space equal to the amount you are allocating to /var/nis for /var/yp to hold the NIS maps that you transfer from NIS.
You also need swap space equal to three times or more of the size of the NIS+ server process--in addition to the server's normal swap-space requirements. The size of the rpc.nisd process is shown by the ps -efl command. Most of this space is used during callback operations or when directories are checkpointed (with nisping -C) or replicated, because during such procedures, an entire NIS+ server process is forked.
NIS+ tables provide several features not found in simple text files or maps. They have a column-entry structure, accept search paths, can be linked together, and can be configured in several different ways. You can also create your own custom NIS+ tables. When selecting the table configurations for your domains, consider the following factors discussed in the following sections:
NIS+ tables differ from NIS maps in many ways, but keep two of those differences in mind when designing your namespace:
Review the standard NIS+ tables to make sure they suit the needs of your site. They are listed in the following table.
Note that NIS+ uses slightly different names for the automounter tables:
| Standard NIS+ Tables | |
|---|---|
| NIS+ Table | Information in the Table |
| auto_home | Location of all users' home directories in the domain |
| auto_master | Automounter map information |
| bootparams | Location of the root, swap, and dump partition of every diskless client in the domain |
| client_info | Information about NIS+ clients |
| cred | Credentials for principals who belong to the domain |
| ethers | Ethernet address of every workstation in the domain |
| group | Group password, group ID, and members of every group in the domain |
| hosts | Network address and host name of every workstation in the domain |
| mail_aliases | Information about the mail aliases of users in the domain |
| netgroup | The netgroups to which workstations and users in the domain may belong |
| netmasks | Networks in the domain and their associated netmasks |
| networks | Networks in the domain and their canonical names |
| passwd | Password information about every user in the domain |
| protocols | List of IP protocols used in the domain |
| rpc | Remote procedure call (RPC) program numbers for RPC services available in the domain |
| sendmailvars | Mail domain |
| services | Names of IP services used in the domain and their port numbers |
| timezone | Time zone of the domain |
The following table lists the correspondences between NIS maps and NIS+ tables. You do not have to synchronize related tables. The NIS+ tables store essentially the same information as NIS maps, but they consolidate similar information into a single table (for example, the NIS+ hosts table stores the same information as the hosts.byaddr and hosts.byname NIS maps). Instead of the key-value pairs used in NIS maps, NIS+ tables use columns and rows. (See NIS+ Tables and Information.) Key-value tables have two columns, with the first column being the key and the second column being the value. Therefore, when you update any information, such as host information, you need only update it in one place, such as the hosts table. You need not worry about keeping that information consistent across related maps.
The dots were changed to underscores in NIS+ because NIS+ uses dots to separate directories. Dots in a table name will cause NIS+ to mistranslate names. For the same reason, machine names cannot contain any dots. For example, a machine named sales.alpha is not allowed. Change it to sales_alpha or salesalpha or any other name that does not contain a dot.
To make the transition from NIS to NIS+, you must change the dots in your NIS automounter maps to underscores. You may also need to do this on your clients' automounter configuration files.
| Correspondences Between NIS Maps and NIS+ Tables | ||
|---|---|---|
| NIS Map | NIS+ Table | Notes |
| auto.home | auto_home | |
| auto.master | auto_master | |
| bootparams | bootparams | |
| ethers.byaddr | ethers | |
| ethers.byname | ethers | |
| group.bygid | group | Not the same as NIS+ groups |
| group.byname | group | Not the same as NIS+ groups |
| hosts.byaddr | hosts | |
| hosts.byname | hosts | |
| mail.aliases | mail_aliases | |
| mail.byaddr | mail_aliases | |
| netgroup | netgroup | |
| netgroup.byhost | netgroup | |
| netgroup.byuser | netgroup | |
| netid.byname | cred | |
| netmasks.byaddr | netmasks | |
| networks.byaddr | networks | |
| networks.byname | networks | |
| passwd.byname | passwd | |
| passwd.byuid | passwd | |
| protocols.byname | protocols | |
| protocols.bynumber | protocols | |
| publickey.byname | cred | |
| rpc.bynumber | rpc | |
| services.byname | services | |
| ypservers | Not needed | |
Determine which nonstandard NIS maps you use and their purpose. Can they be converted to NIS+ or replaced with NIS+ standard maps?
Some applications may rely on NIS maps. Will they still function the same way with NIS+, and can they function correctly in a mixed environment?
To build a custom table in NIS+, use nistbladm. Remember that you cannot use dots in the table names.
If you want to use NIS+ to support your custom NIS maps, you should create a key-value table, a table with two columns. The first column is the key and the second column is the value. If you then run the NIS+ servers in NIS-compatibility mode, the NIS clients will not notice any change in functionality.
NIS+ tables contain information only about the resources and services in their home domain. If a client tries to find information that is stored in another domain, the client has to provide the other domain name. You can make this "forwarding" automatic by connecting the local table to the remote table. NIS+ tables can be connected through paths or links.
Paths and links should not be used if you are going to have NIS clients in the NIS+ namespace, because NIS clients are unable to follow the paths or links to find the appropriate information.
If information in a particular NIS+ table is often requested by clients in other domains, consider establishing a path from the local NIS+ table to the one in the other domain.
Such a path would have two main benefits:
However, such a path would also hurt performance. Performance is especially affected when searches are unsuccessful, because the NIS+ service must search through two tables instead of one. When you use paths, a table lookup now also depends upon the availability of other domains. This dependence can reduce the net availability of your domain. For these reasons, use paths only if you do not have any other solution to your problem.
You should also be aware that since "mailhost" is often used as an alias, when trying to find information about a specific mail host, you should use its fully qualified name in the search path (for example, mailhost.sales.wiz.com). Otherwise, NIS+ returns all the "mailhosts" it finds in all the domains it searches through.
The path is established in the local table, with the -p option to the nistbladm command. To change a table's path, you must have modify access to the table object. To find out what a table's search path is, use the niscat -o command (you must have read access to the table).
Links between tables produce an effect similar to paths, except that the link involves a search through only one table: the remote table. With a search path, NIS+ first searches the local table, and only if it is unsuccessful, does it search the remote table. With a link, the search moves directly to the remote table. In fact, the remote table virtually replaces the local table.
The benefit of a link is that it allows a lower domain to access the information in a higher domain without the need to administer its own table.
To create a link, use the nisln command. You must have modify rights to the table object.
Deciding whether to use a path or to link NIS+ tables in a domain is a complex decision, but here are some basic principles:
NIS+ cannot distinguish between a human and a workstation when requests are made. Therefore, within a given namespace, no user can have the same user name as a machine name, and no machine can have the same name as any user ID.
For example, under NIS it was acceptable to have a user with the login name of irina whose local machine is also named irina. Her network address would be irina@irina. This is not allowed under NIS+. When the site is converted to NIS+. either the user will have to change her login name or her machine name will have to be changed. Identical user and machine names are a problem even when the machine with the duplicate name does not belong to the user with the same name. The following examples illustrate duplicate name combinations not valid with NIS+:
The best solution to this problem is to check all /etc files and NIS maps before you use the data to populate NIS+ tables. If you find duplicate names, change the machine names rather than the login names, and later create an alias for the machine's old name.