This section provides general guidelines and recommendations for making choices about security in your namespace. This section contains the following topics:
Because NIS+ provides security that NIS did not, NIS+ security requires more administrative work. It may also require more work from users who are not used to performing chkey, keylogin, or keylogout procedures. Furthermore, the protection provided by NIS+ is not entirely secure. Given enough computing power and the right knowledge, the Diffie-Hellman public-key cryptography system can be broken. In addition, the secret key stored with the key server process is not automatically removed when a credentialed nonroot user logs out unless that user logs out with keylogout. (See the keylogout command description for more information.) The root user's key, created by keylogin -r and stored in /etc/.rootkey, remains until the .rootkey file is explicitly removed. The superuser cannot use keylogout.
NIS+ security benefits users because it improves the reliability of the information they obtain from NIS+, and it protects their information from unauthorized access. However, NIS+ security requires users to learn about security and requires them to perform some administrative steps.
Although NIS+ requires a network login, users are not required to perform an additional key login because the login command automatically gets the network keys for the client when the client has been correctly configured. Clients are correctly configured when their login password and their Secure RPC password are the same. The secret key for the user root is normally made available in the /etc/.rootkey file. When the NIS+ user password and credential are changed with the passwd command, the credential information is automatically changed for the user.
If your site allows users to maintain passwords in their local /etc/passwd files in addition to their Secure RPC passwords, and if these passwords are different from the Secure RPC passwords, then users must run keylogin each time they run login. For more information, see Administering Passwords.
Because AIX 4.3.3 includes the DES encryption mechanism for authentication, administrators who need secure operation do not need to purchase a separate encryption package. However, administrators must train users how and when to use the passwd command.
Furthermore, setting up a secure NIS+ namespace is more complex than setting up a namespace without any security. The complexity comes not only from the extra steps required to set up the namespace, but from the job of creating and maintaining user and machine credentials for all NIS+ principals. Administrators have to remove obsolete credentials just as they remove inactive account information from the passwd and hosts tables. Also, when servers' public keys change, administrators have to update the keys throughout the namespace (using nisupdkeys). Administrators also have to add local credentials for users from other domains who want to log in remotely to this domain and have authenticated access to NIS+.
After you become familiar with the benefits and the administrative requirements of NIS+ security, you must decide whether to implement NIS+ security during or after the transition. It is recommended that you use full NIS+ security even if you operate some or all servers in a domain in NIS-compatibility mode. (All servers in a domain should have the same NIS-compatibility status.) However, this entails a heavy administrative burden. If you prefer a simpler approach, set up the NIS+ servers and namespace with NIS-compatible security, but decline to create credentials for NIS+ clients. Administrators and servers would still require credentials. The NIS+ clients would be relegated to the nobody class, along with the NIS clients. This reduces training and setup requirements, but it has the following drawbacks:
NIS+ provides two types of credential: local and DES. All NIS+ principals need at least one of these credentials. When the namespace is running at security level 2 (the default), all NIS+ principals (clients) must have DES credentials in their home domains. In addition, all users (not workstations) must have local credentials in their home domains and in every other domain for which they need login access.
To determine the credential needs of your namespace, consider the type of principal and the type of credential.
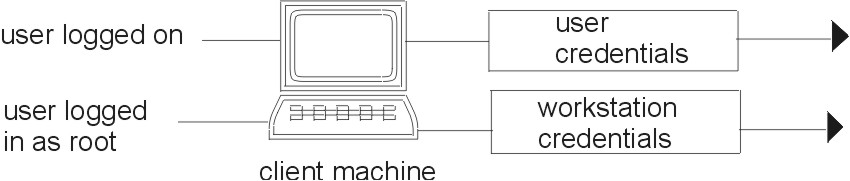
NIS+ principals can be users or the superuser identity on the client workstation, as shown in the following figure.
Figure 3-4. NIS+ Principals.. This illustration shows a user logged on to a client machine has User credentials. A user logged on as root to a client machine has Workstation credentials.
|
When you determine the credentials you need to create, make sure you know which type of principal the credential is for. For instance, when you set up an NIS+ client with the nisclient script, you will create credentials for both the workstation and for the corresponding user. All users on that workstation must run the nisclient script to be configured as NIS+ users. Unless credentials for the user are also created, the user would only have the access rights granted to the nobody class. If you do not give some access rights to the nobody class, the namespace will not be available to users.
Note: The nisclient script fails unless the user has existing entries in the passwd and cred tables.
NIS+ is designed to be run at security level 2, which is the default. Security levels 0 and 1 are provided only for the purpose of testing and debugging. Do not run an operational network with real users at any level other than level 2. See Administering NIS+ Directories for more information on the NIS+ security levels.
Password-aging is a mechanism that you can use to force users to periodically change their passwords. Password-aging allows you to:
Keep in mind that users who are already logged in when the various maximums or dates are reached are not affected by the above features. They can continue to work as normal. Password-aging limitations and activities are activated only when a user logs in or performs one of the following operations:
These password-aging parameters are applied on a user-by-user basis, and you can have different password-aging requirements for different users. You can also set general default password-aging parameters that apply to all users except those you have individually set.
When planning your NIS+ namespace, decide which password-aging features you want to implement, and the default values you want to specify. For additional information on password-aging, see Administering Passwords.
NIS+ uses groups as a means to provide NIS+ access rights to several NIS+ principals at one time; it is used only for NIS+ authorization.
An NIS+ group is one of the four authorization classes on which access rights are based. The four classes are:
The default name of the group created by NIS+ scripts for such purposes is the admin group. You can create other groups with different names and assign different groups to different NIS+ objects. This can be done as a default parameter by setting the environment variable NIS_GROUPS to whatever group you prefer.
Member users of an object's group usually have special privileges to that object, such as permission to make certain changes to the object. For example, you could add several junior administrators to an admin group so that they can only modify the passwd and hosts tables, but they would be unable to modify any other tables. By using an admin group, you can distribute administration tasks across many users and not just reserve them for the superuser of the entire hierarchy. The NIS+ admin group must have credentials created for its members even if you are running the domain in NIS-compatibility mode, because only authenticated users have permission to modify NIS+ tables.
After identifying the type of credentials you need, select the access rights that are required in the namespace. To make that task easier, first decide how many administrative groups you will need. Using separate groups is useful when you want to assign them different rights. Usually, you create groups by domain. Each domain should have only one admin group.
After arranging your principals into groups, determine the kind of access rights granted by the objects in the namespace to those groups, as well as to the other classes of principal (nobody, owner, group, and world). Planning these assignments ahead of time will help you establish a coherent security policy.
As shown in the following table, NIS+
provides different default access rights for different namespace
objects.
| Default Access Rights for NIS+ Objects | ||||
|---|---|---|---|---|
| Object | Nobody | Owner | Group | World |
| Root-directory object |
r--- |
rmcd |
rmcd |
r--- |
| Non-root directory object |
r--- |
rmcd |
rmcd |
r--- |
| groups_dir directory objects |
r--- |
rmcd |
rmcd |
r--- |
| org_dir directory objects |
r--- |
rmcd |
rmcd |
r--- |
| NIS+ groups |
---- |
rmcd |
r--- |
r--- |
| NIS+ tables (see Planning Access Rights to NIS+ Tables) | varies | varies | varies | varies |
You can use the default rights or assign your own. If you assign your own, consider how the objects in your namespace will be accessed. Keep in mind that the nobody class comprises all requests from NIS+ clients, whether authenticated or not. The world class comprises all authenticated requests from NIS+ clients. Therefore, if you do not want to provide namespace access to unauthenticated requests, do not assign any access rights to the nobody class; reserve them only for the world class. On the other hand, if you expect some clients--through applications, for instance--to make unauthenticated read requests, assign read rights to the nobody class. If you want to support NIS clients in NIS-compatibility mode, assign read rights to the nobody class.
Also consider the rights each type of namespace object will assign to the NIS+ groups you specified earlier. Depending on how you plan to administer the namespace, you can assign all or some of the available access rights to the group. A good solution is to have the user root on the master server be the owner of the admin group. The admin group should have create and destroy rights on the objects in the root domain. If you want only one administrator to create and modify the root domain, then put just that administrator in the admin group. You can always add additional members to the group. If several administrators may be involved in the setup process, put them all in the group and assign full rights to it. That is easier than switching ownership back and forth.
Finally, the owner of an object should have full rights, although this is not as important if the group does. A namespace is more secure if you give only the owner full rights, but it is easier to administer if you give the administrative group full rights.
NIS+ objects other than NIS+ tables are primarily structural. NIS+ tables, however, are informational objects. Access to NIS+ tables is required by all NIS+ principals and applications running on behalf of those principals. Therefore, their access requirements are somewhat different.
The following table lists the default
access rights assigned to NIS+ tables. If any columns provide rights in
addition to those of the table, they are also listed. You can change
these rights at the table and entry level with the nischmod
command, and at the column level with the nistbladm -u
command. Protecting the Encrypted Passwd Field provides just one example of how to change table rights to
accommodate different needs.
Note: NIS-compatible domains give the nobody class read rights to the passwd table at the table level.
As you can see in the previous table, read access is provided by default to the nobody class by all tables except the passwd table. NIS+ tables give the nobody class read access because many applications that need to access NIS+ tables run as unauthenticated clients. However, if this were also done for the passwd table, it would expose the encrypted passwd column to unauthenticated clients.
The configuration shown in the previous table is the default set of access rights for NIS-compatible domains. NIS-compatible domains must give the nobody class read access to the passwd column because NIS clients are unauthenticated and would otherwise be unable to access their passwd column. Therefore, in an NIS-compatible domain, even though passwords are encrypted, they are vulnerable to decoding. They would be much more secure if they were not readable by anyone except their owner.
Standard NIS+ domains (not NIS-compatible) provide that extra level of security. The default configuration (provided by nissetup) uses a column-based scheme to hide the passwd column from unauthenticated users while still providing access to the rest of the passwd table. At the table level, no unauthenticated principals have read access. At the column level, they have read access to every column except the passwd column.
Entry owners have both read and modify access to their own entries. They obtain read access by being a member of the world class. (Remember that at the table level, the world class has read rights.) They obtain modify access by explicit assignment at the column level.
Table owners and entry owners are rarely and not necessarily the same NIS+ principals. Thus, table-level read access for the owner does not imply read access for the owner of any particular entry.
For a more complete explanation and discussion of table-, entry-, and column level-security, see Chapter 7, Security.